
Important Information
Tenants must refer to our Tenant Advice Hub, as well as Drake & Co’s Guide to Appliances, Maintenance and Living in your Property, before contacting us to report a repair.
Please report any issues you are unable to resolve yourself using the Report a Problem / Repair Request Form below.
If there is more than one problem and/or repair required in the property, make sure that you include all of these in list format on one form. You can upload up-to-five photos to the form to support your request, staff will request additional photos from you if required.
Provide as much detail as possible, so we can arrange for the most suitable contractor to attend and investigate. Describe what the problem is and avoid using vague words like ‘broken’.
For example, don’t report “light bulb needs to be replaced”, please specify which type of bulb you are referring to and where it is located – “A spotlight needs to be replaced in the downstairs hallway.” This means that we are able to action this quickly and efficiently, without any confusion.
Please note, if tenants request for a contractor/engineer to attend and it is found that tenants have caused or could have easily resolved the problem, tenants may be responsible for the cost of the contractor’s visit.
Tips and Advice
The information and videos below are provided as guidance only. The exact appliances/systems will vary depending on the property.
Take a look around the property and generate a list of repairs. Communicate with your housemates as they may also be aware of other issues they would like investigating.
Report all issues in bullet point / list format on one form. Maintenance can look at all of the issues during one visit, rather than going back and forth.
Do not submit multiple individual forms.
Remember to state which room(s) each issue relates to and explain what the problem is clearly.
It is the tenants’ responsibility to change light bulbs throughout the property, as stated in the Tenancy Agreement. Tenants can find more information on how to change light bulbs on page 18 of Drake & Co’s Appliance and Maintenance Guide, which is included on the Tenant Advice Hub.
If the light bulb is too high to reach or is a complicated fitting, please complete a Repair Request specifying which bulb(s) need to be changed and why you are unable to change this, so we can arrange for maintenance to attend.
Mould growth is often due to a build up of condensation, which is preventable by ensuring that the property is heated and ventilated adequately.
Please see Drake & Co’s Guide to Tackling Condensation and Mould, which is accessible via our Tenant Advice Hub. This contains detailed information about your responsibilities, steps you should follow to prevent condensation and mould in the property, and advice for treating any mould you have allowed to develop.
Tenants must ensure that they have referred to our guidance before submitting a Repair Request, otherwise tenants may be responsible for the cost of the contractor’s visit.
Don’t forget to consider the following:
- Is the heating on a reasonable temperature for enough time throughout the day?
- Are the windows being opened in the property, to allow air to circulate?
- Are you using extractor fans in bathrooms and/or kitchens when using appliances?
- If there is mould growth behind a piece of furniture e.g. wardrobe or bed, is this pressed directly against the wall? This stops the air flow and creates a perfect environment for mould growth.
- Could the mould growth/wet patch be caused by a leak? Check to see if the gutters are blocked, or, if there is a leak from the roof or a bathroom above.
Click Here to watch a video which may help explain why condensation and mould occurs, as well as ways to prevent this.
The majority of properties we manage have burglar alarms installed.
Page 7 of Drake & Co’s Appliance and Maintenance Guide provides detailed information and advice about security alarms, this is accessible via the Tenant Advice Hub.
Most burglar alarms require a four digit code, which you will have been informed of when collecting your keys at the beginning of the tenancy. If you have forgotten this, please email the office so we can remind you.
- Make sure all windows and internal and external doors are closed/locked before setting the alarm.
- Input the code using the panel. This should begin beeping, indicating it is counting down before setting.
- Lock the door and wait for the beeping to stop. Once the beeping has stopped, this means that the burglar alarm has set.
- The first person to re-enter the property will need to input the same code to disable the alarm.
If the alarm is not disabled in time, it will emit a loud siren-like noise (for a maximum of fifteen minutes) and the light at front of the property will flash. You will need to enter the code and click reset, or the “x” button in order to reset this.
The external alarm siren will continue to flash at the front of the property until this has been reset. You will also be unable to set the burglar alarm until the alarm has been reset, leaving the property and its contents vulnerable.
If you notice a leak within the property, please follow the steps below and report this IMMEDIATELY.
Leaks outside of office hours must be reported to the emergency contracts, following the instructions on the ‘Out of Hours Emergencies‘ page. Click Here for more information.
- It is very important to find where this is coming from and minimise the damage it may cause to the property. There are various things that could cause a leak in a property, so many possibilities you should consider.
- Always check which room is above the leak first and foremost. Does the leak correlate with the bath or shower being used, or the toilet being flushed? Has a sink overflown, or is it coming from a radiator? Has something been spilled and/or is there a puddle of water on the floor in the room above the leak? Could it be coming from the roof (or flat roof above a bay window) and has it been raining?
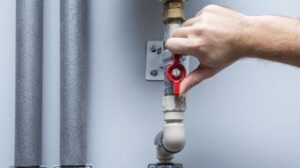
- Once you have identified the cause of the leak, you may be able to control it. This may seem obvious, but for clarity sake – if you find that the shower is causing the leak- stop using it. If it is a sink or toilet, there may be an isolator valve which you can use to stop the water flow to the particular appliance. Roof leaks cannot be controlled, but you can still minimise damage.
- If you are unable to find the source of the leak and water is still running, locate the stop tap to turn the water off. See below for more information.
- Always remember to place a bucket/bowl beneath the leak to catch any water and stop it from damaging the floor/furniture. Use a mop and/or towels to clean up any water before this soaks in.
- Move any belongings/furniture from underneath/around the affected area to prevent them from being damaged too.
- Report the leak. If you manage to control the leak, simply report this via the online portal so staff are aware and take the appropriate action. If the leak is uncontrollable and/or there is lots of water/damage to the floor/walls/ceiling, you will need call the office on 0161 224 2134 to notify staff urgently. After calling the office, tenants must also report the leak using our Report a Problem Form so this is added onto our system.
Stop Tap
An internal stop tap (sometimes called a stop valve or stopcock) is the point where you can shut off the water supply to your home.
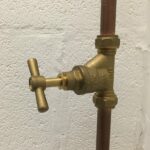
Internal stop taps (inside the house) are generally located near water pipes, like underneath the kitchen or bathroom sink, behind the washing machine, in the cellar, or sometimes in the lounge, kitchen or hallway. Once you have turned the stop tap off, the water in the property will be switched off until it is turned back on again. You may find that the leak will continue for a short period of time as the water already in the pipes will need to drain.
Some properties do not have internal stop taps, CLICK HERE to see more information on external stop taps.
If you are unable to find the stop tap/have been unable to switch this off, please notify staff as soon as possible.
Leak from the roof and/or windows
These types of leaks often occur when the weather is poor e.g. heavy rain and high winds. Whilst you won’t be able to shut the water supply off, you can minimise the damage by leaving buckets/towels underneath to catch the water. If you notice a leak stain and think this is being caused by the weather, please report this immediately. Although, in order for a contractor to check the roof safely, the weather must be dry and calm.
Leak when taking a shower/bath
If you see a leak coming through the ceiling below a bath/shower room this is most likely caused by the shower/bath. Stop using this immediately and inform Drake & Co. The shower/bath may need re-sealing to prevent the water from leaking, this means the shower will be out of order for a minimum of one day as the new silicone and/or grout needs time to dry. Open the window in the bathroom during this time, as this causes a strong odour to occur.
If the shower/bath is not cleaned regularly and the sealant is left to produce mould and turn green, this can also cause leaks. Tenants will be charged for mouldy sealant if it’s clear it has been poorly maintained. Purchase a bathroom cleaner spray to combat mould growth. Mould can be removed using a bleach based spray e.g. Astonish Mould and Mildew, or Dettol Mould spray which can be purchased at most retailers.
Leak from a toilet/sink
If you find that the leak is coming from the toilet and/or sink (you may see a build-up of water on the floor around the toilet, or find a pipe behind the sink is leaking), please stop using the toilet/sink. You must report the leak and follow the steps above to prevent water damage to the surrounding area.
There may be isolator valves fitted to the toilet/sink which can be turned off to isolate the water supply. Some isolator valves have handles that can be turned, others require a flathead screwdriver to turn the dial. If you cannot turn them off, please let staff know and they will do their best to assist you/arrange for a contractor to attend as soon as they can.
If your electricity (plug sockets and/or lights) cuts out at any point, there could be a couple of reasons for this.
If the problem is also affecting neighbouring properties, this could be an area-wide fault. Drake & Co and/or our contractors will be unable to assist with this. You will need to check with Electricity North West to see if the problem has been reported to them. Search your postcode on the ENW website and see their fault tracker which will give you live updates about when they have arranged for an engineer to attend and when they expect the problem to be resolved.
If the problem is only affecting your property, this likely means that your electrics have tripped. Each property will have a fuse box/consumer unit (some have multiple) which contains the fuses for the electrical system in the property. These will trip/switch off, if it registers a faulty connection or is overloaded; this is for your safety.
Using too many appliances at once is a common cause of fuses tripping. If you are making toast, whilst boiling the kettle, using the microwave, washing your clothes and watching TV simultaneously, it’s not surprising that the fuse may overload. Another risk is plugging too many things into one socket/outlet.
If you are not overloading the system, you could have a faulty device/appliance plugged in.
Most of the time, you should be able to get your electrics back on yourself, by following these steps:
- Locate your fuse box/consumer unit. This could be anywhere inside of the property, such as near your electric meter, in the hallway, under the stairs, in a cupboard/cabinet, in the cellar, in a bedroom etc.
- You will see lots of fuses/switches on the consumer panel which are labelled e.g. first floor, kitchen, lounge etc. These should all be switched on (in the upward position).
- Check if any (or all) of the fuses have tripped (tripped switches will be in the downward position).
- Trying switching them back on again. This will either fix the issue, or, the switches will immediately trip again.
- If it trips again, this indicates that the item/appliance causing the problem is still plugged in/switched on. You will need to go around the property room by room, unplugging all of the appliances and turning off lights and isolator switches for extractors, showers. First, try unplugging the last item used before the electrics tripped, as this may be the culprit. Don’t forget things like the fridge, freezer, kettle, toaster, washing machine, dryer, oven, iron, lamps, phone/laptop chargers, etc.
- After everything is off, return to the consumer unit and flip the fuse back on.
- If it trips again, you may have missed something and will need to take another look around the house making sure everything is off and unplugged.
- Once you manage to get the fuse back on, you can then carefully begin to plug appliances back in, one by one.
- Continue to do this until you plug something in that causes the electrics trip again (if at all), this will allow you to identify the problem. Keep the problematic item/appliance unplugged/switched off to allow the rest of the electrics to work.
- If the problematic appliance is provided by the Landlord (e.g. oven, fridge freezer, microwave) please report this to us immediately using our Report a Problem Form. If it belongs to you/your housemates (e.g. toaster, kettle, hairdryer, charger, lamp etc) you will need to have this repaired or replaced.
During any type of power cut, remember to keep the fridge/freezer doors closed to retain the cold air/temperature.
You will likely also need to reset your burglar alarm afterwards as this may detect a fault during the power outage.
Page 17 of Drake & Co’s Appliance and Maintenance Guide, which is included on the Tenant Advice Hub is dedicated to vacuum cleaners.
The most common type of hoovers supplied within our properties are: Yellow Karcher, Silver P, or Henry Hoovers.
If you find that the hoover is not working, this could be due to a blockage in the hose/pipe or, the cylinder has not been emptied.
Both the Yellow Karcher and Silver P hoovers have a little grey clip which holds the filter to the motor. If this has become dislodged or lost, the vacuum cleaner will be unable to function until this has been replaced.
Please ensure that you and your housemates (if applicable) have checked the above, before reporting this. Otherwise, if maintenance attend and find this is easily fixable, tenants will be responsible for the cost of the contractor’s visit.
If the hoover is cleaned and maintained on a regular basis, tenants will be less likely to experience issues with this throughout the tenancy.
Detailed links and information regarding maintaining washing machines can be found on pages 13 and 15 of Drake & Co’s Appliance and Maintenance Guide, which is included on the Tenant Advice Hub.
Tenants must ensure that they regularly check the filter is clear when using the washing machine. If the filter becomes blocked by debris such as: coins, wrappers, bobbles etc, this causes a blockage which stops the appliance from functioning correctly. Remember to check the pockets of items of clothing before running a cycle.
If you find that the washing machine is leaking, this usually means that the filter is blocked. Most washing machine filters are located at the bottom of the appliance. If you are unsure where this is, search the make and model of the machine online and you will be able to find the PDF instructions to help you.
Click Here to see an example of how to clean a washing machine filter.
Please note, if our whitegoods engineer informs us that the problem reported is due to improper maintenance, tenants will be responsible to pay for this repair.
Detailed links and information regarding dryers can be found on pages 13 and 15 of Drake & Co’s Appliance and Maintenance Guide, which is included on the Tenant Advice Hub.
Tenants often accidentally overload dryers which can cause the drum to dislodge. Please refrain from drying too many clothes at once, as if this causes damage, tenants will be responsible to pay for this repair.
Some properties have a vented dryer which means that the water drained from wet clothes is released outside.
Other properties will have a condenser dryer installed. Tenants are required to manually empty the water tank, as this is where the water is collected during each cycle. The dryer will have a light which displays when this needs to be emptied.
Both condenser and vented dryers have filters which must be checked and cleaned regularly, otherwise this may cause the machine to breakdown. The lint filter must be cleaned in-between each load, otherwise this is a fire hazard.
Click Here to see an example video showing how to clean a filter on a dryer.
Please note, if our whitegoods engineer informs us that the problem has occurred due to improper maintenance, tenants will be responsible to pay for this repair.
Detailed information regarding fridge/freezers can be found on pages 13-14 of Drake & Co’s Appliance and Maintenance Guide, which is included on the Tenant Advice Hub. This contains a range of common issues you may experience with a fridge and/or freezer, and steps you can take to investigate/remedy these independently before requesting an engineer appointment.
If a whitegoods engineer visits and finds that the problem is caused by improper maintenance and/or tenants could’ve resolved this themselves, tenants would be responsible for the cost of the visit.
Some common problems and their causes can be found below:
- The temperature needs adjusting. Most fridges and/or freezers are controlled using a thermostat dial that is labelled 1-5. Please set this to 3. If this isn’t cold enough, you can adjust it. However, if you set it on to 5, your food and drinks may freeze whilst in the fridge.
- The fridge/freezer is overfilled. If the appliance has been filled to the brim with food/drink, cool air won’t be able to circulate and the door may be unable to close properly. Both doors must be closed flush against the seals to ensure that the temperature can regulate.
- A blockage in the drain hole. The drain hole is usually located on the back wall inside the fridge. This allows any liquid produced through condensation to drain correctly. If this becomes blocked, the water will build up within the fridge and eventually leak. Make sure the drain hole is kept clear.
- The freezer is over frozen. A build up of ice in the freezer can cause the temperature in the fridge to fluctuate as it won’t be able to regulate throughout the appliance properly. Please chip away any ice carefully and defrost the appliance (using the instructions below).
How do you defrost a fridge freezer?*
You may find that your freezer has a build up of ice which is preventing the door from closing properly. Or, your drawers/baskets/shelves are difficult to insert or remove from the appliance. It is essential that you do not pull on these if they are frozen, otherwise they will break and you will be responsible for the cost of replacements. Follow the steps below to defrost your appliance:
- Empty the fridge and freezer of all items.
- Switch the appliance off at the wall.
- Open both the fridge and freezer doors and make sure they stay open whilst the appliance is defrosting. You may need to use something to prop the doors open as some models have hinges which self close.
- Place towels/bowls on the floor to catch the water from the thawing ice and prevent any damage to the floor.
- Leave the appliance off for at least 24 hours so it can defrost completely.
- Mop up any water, close the doors and switch the appliance back on (as long as all ice has melted).
You may wish to take the opportunity to clean the inside and outside the appliance once it has defrosted, to keep it fresh.
*Please note, if the appliance is not “frost free” it needs to be defrosted every 3-4 months. This removes all of the ice so the air can flow between each compartment and regulate the temperature correctly.
Detailed information regarding maintaining dishwashers can be found on page 16 of Drake & Co’s Appliance and Maintenance Guide, which is included on the Tenant Advice Hub.
If there is a dishwasher installed in the property, tenants must maintain this in order for it to continue working efficiently.
If you find that your dishwasher is not working correctly, please check the salt and/or rinse aid levels and keep these topped up at all times. Your dishwasher will perform poorly without these.
All dishwashers have a filter which needs to be cleaned regularly. If a build up of food occurs this will become blocked and stop the appliance from working. Click Here to see an example of how to clean a dishwasher filter.
Please note, if our whitegoods engineer attends and finds that the problem has occurred due to improper maintenance, tenants will be responsible to pay for this repair.
There are two different types of heating in Drake & Co’s properties: electric or gas central heating.
Detailed information about plumbing and heating can be found on pages 8-11 of Drake & Co’s Appliance and Maintenance Guide, which is included on the Tenant Advice Hub. This includes tips and information on electric and gas central heating, conventional and combi boilers, radiators, as well as how to set a manual and digital timer.
If the property has electric only, there will be storage heaters installed throughout the property. Each storage heater will have its own timer for you to program.
You must ensure that the timer installed is used throughout the duration of the tenancy. If you can’t find the manual for this in the property, search the make and model of the boiler/appliance as they will be available online.
Do not leave the boiler on “constant/on” throughout the duration of the tenancy.
Some properties have a programmer installed to control the hot water, heating, thermostat and timer. This may be installed next to the boiler, in the kitchen, lounge and/or hallway. Programmers are usually battery powered, therefore, they need to be checked regularly to ensure that they have power. If you are unsure how to change the batteries, search the make and model online e.g. Honeywell, Salus etc. This is usually displayed on the front of the controller, or inside the flap which you can open to change the batteries.
Click Here to view a detailed checklist British Gas have made regarding possible issues which could be causing a lack of heating and/or hot water.
Tenants must refer to our Appliance and Maintenance Guide before contacting our office for assistance, to make sure you have followed the advice within and all relevant checks have been completed.
If you do not have heating and/or hot water, this must be reported to us as soon as possible, so we can arrange for maintenance to attend.
If a contractor attends and finds the problem is due to tenants’ negligence (e.g. using incorrect settings, the boiler has been switched off etc), tenants will be responsible for the cost of the contractor’s visit.
Tenants must keep their keys with them at all times to avoid becoming locked out of the property or their room (e.g. if your door locks behind you, if your housemates aren’t home when you return to the property).
If you lose your keys, please contact the office for a replacement set. You will be responsible to cover the cost of the replacement keys.
If you become locked out whilst the office is open, you can attend our office to borrow our spare keys free of charge and let yourself back in. Our keys must be returned the same working day.
If you are locked out whilst our office is closed, you can contact our emergency contractors for assistance. Detailed information and instructions can be found on our Out of Hours Emergencies page. Tenants will be required to pay any costs associated with regaining access. The out of hours contractors are self-employed and usually request payment upfront, they would provide you with information about their prices when you contact them.
Alternatively, you can wait and attend our office the next working day to borrow our keys to let yourself back in again.
More information regarding keys, locks and being locked out can be found on pages 5-6 of Drake & Co’s Appliance and Maintenance Guide, which is included on the Tenant Advice Hub.
We have created a detailed Broadband Troubleshooting Guide which is accessible via the appliance and maintenance section of the Tenant Advice Hub. This contains lots of tips, useful links and advice for tenants experiencing issues with their internet connection. There are also step by step instructions which tenants must complete before reporting a problem with their internet to us.
Most of the properties which opt for the Bills Inclusive Package have BT Business Broadband, brsk, or NOW . If you are unsure which broadband provider you have, please email info@drakes.co.uk or info@billspaidltd.co.uk.
If you are struggling with your internet connection, try these quick and easy steps.
1. Turn your router off and then on again! This may sound simple, but it can help if your Hub is experiencing a glitch or has overheated.
2. Check the lights on your router and what colours are displayed. Different lights may indicate different issues. See page 3 of the Broadband Guide for useful links and follow the provider’s guidance for this.
3. Restart your equipment. The reset button is usually located on the back of the router, you may need to use something small like a pen nib or pin to press and hold it for at least 30 seconds.
4. Check filter(s) and wiring. The easiest way to check this is referring to page 3 of the guide and following the instructions/videos on how to set up your type of router. If you’re using an extension cable or any other extra wiring/adapters, remove these to see if that is causing the problem.
5. Check you are using the master socket. In some properties, there are multiple phone sockets fitted in places like the hallway, bedrooms or communal areas. The router must be plugged into the master socket, if another socket is being used the broadband will not work as this isn’t being powered by BT.
6. Try a wired connection. If you are connecting to the broadband using Wi-Fi, remember that Wi-Fi isn’t guaranteed by broadband providers as it can be affected by multiple variables (number of devices connected, distance from router, walls/obstacles, interference etc). You must connect your device to the router using an ethernet cable to check if this works, see page 4 for more information. If using a wired connection solves the problem, you may need to check the wireless settings on the router or your devices. Refer to page 5 and follow the advice to improve a Wi-Fi connection.
7. Complete a speed test. If you are able to connect but the internet is slow, refer to page 2 (Providers and Speeds) and follow the instructions using the link provided to complete a speed test.
If you have followed all of the steps above and are still experiencing an issue with your broadband, please report this to us and provide the following information:
- What the problem is
- How long you have been experiencing this
- Which router you have
- The colour the hub displays
- Whether you have tried a wired connection and if this makes a difference
- What speeds you are achieving when completing the speed test
You may be asked to run more tests before a member of staff can contact your provider. Please note, if the provider sends an engineer at your request and the engineer finds no problem, or that the problem was easily fixable (equipment set up incorrectly etc), tenants would be responsible to pay any costs associated with the visit. Engineers also charge for missed appointments, therefore you must ensure that you are available during the appointment slot.
Please refer to the Broadband Guide before reporting the problem to us and ensure that you read the information within.